Running a Pathway Live Data Framework Application in Nebius AI Cloud
The Pathway Live Data Framework enables you to define and run various data processing pipelines. You can find numerous tutorials that guide you through building systems like log monitoring, ETL pipelines with Kafka, or data preparation for Spark analytics.
Once you've developed and tested these pipelines locally, the next logical step is to deploy them in the cloud. Cloud deployment allows your code to run remotely, minimizing interruptions from local machine issues. This step is crucial for moving your code into a production-ready environment.
There are several ways to deploy your code to the cloud. You can deploy it on GCP or using Render, for example. In this tutorial, you will learn how to deploy your application code on Nebius AI Cloud using the Pathway Live Data Framework's tools and a ready-to-use Docker Hub image, which is provided to simplify the process.
The tutorial is structured as follows:
- Description of the ETL example pipeline.
- Presentation of the Pathway Live Data Framework CLI and the Docker Hub container.
- Step-by-step guide to setting up a deployment on Nebius AI Cloud.
- Results verifications.
- Conclusions.
Before you continue, please ensure your project meets these basic requirements:
- The project is hosted on a public GitHub repository.
- The requirements.txt file in the root directory lists all the Python dependencies for the project.
ETL Example Pipeline
Let's take the "Data Preparation for Spark Analytics" tutorial as an example. This tutorial walks you through building an ETL process that tracks GitHub commit history, removes sensitive data, and loads the results into a Delta Lake. For a detailed explanation, you can refer to the article that covers this task in depth.

The tutorial's code is available in a Github repository. A few changes have been made to simplify the process:
- The GitHub PAT (Personal Access Token) can now be read from an environment variable.
- Spark computations have been removed since they aren't necessary in a cloud-based container.
Additionally, the README file has been updated to offer more guidance on using Pathway Live Data Framework CLI tools to run the project.
There's an important point to consider regarding the task's output. Originally, there were two possible output modes: storing data in a locally-based Delta Lake or in an S3-based Delta Lake. In cloud deployment, using a locally-based Delta Lake isn't practical because it only exists within the container on a remote cloud worker and isn't accessible to the user. Therefore, this tutorial uses an S3-based Delta Lake to store the results, as it provides easy access afterward. This approach requires additional environment variables for the container to access the S3 service, which will be discussed further.
Pathway Live Data Framework CLI and the Docker Hub container
Pathway Live Data Framework CLI
The Pathway Live Data Framework provides several tools that simplify both cloud deployment and development in general.
The first tool is the Pathway Live Data Framework CLI. When you install the framework, it comes with a command-line tool that helps you launch your applications. For example, the spawn command lets you run code using multiple computational threads or processes. For example, pathway spawn python main.py runs your locally hosted main.py file.
This tutorial highlights another feature: the ability to run code directly from a GitHub repository, even if it's not hosted locally.
Take the airbyte-to-deltalake example mentioned earlier. You can run it from the command line by setting two environment variables: GITHUB_PERSONAL_ACCESS_TOKEN for your GitHub PAT and PATHWAY_LICENSE_KEY for your Pathway Live Data Framework license key. Then, simply call pathway spawn using --repository-url to define the GitHub repository to run.
This approach allows you to run remotely hosted code as follows:
GITHUB_PERSONAL_ACCESS_TOKEN=YOUR_GITHUB_PERSONAL_ACCESS_TOKEN \
    PATHWAY_LICENSE_KEY=YOUR_PATHWAY_LICENSE_KEY \
    pathway spawn --repository-url https://github.com/pathway-labs/airbyte-to-deltalake python main.py
When the --repository-url parameter is provided, the CLI automatically handles checking out the repository, installing any dependencies listed in the requirements.txt file within an isolated environment, and running the specified file.

Additionally, you can use the PATHWAY_SPAWN_ARGS environment variable as a shortcut for running pathway spawn. This allows you to run code from a GitHub repository with the following command:
GITHUB_PERSONAL_ACCESS_TOKEN=YOUR_GITHUB_PERSONAL_ACCESS_TOKEN \
    PATHWAY_LICENSE_KEY=YOUR_PATHWAY_LICENSE_KEY \
    PATHWAY_SPAWN_ARGS='--repository-url https://github.com/pathway-labs/airbyte-to-deltalake python main.py' \
    pathway spawn-from-env
Pathway Live Data Framework Container
Another useful resource from Pathway is the Docker container, listed at Docker Hub. This listing offers a ready-to-use Docker image with the Pathway Live Data Framework and all its dependencies pre-installed, and without binding to a particular ecosystem. You can use the container without a license key, but entering one unlocks the full features of the framework. The listing is free to use, so there's no cost associated with accessing it.
The container runs the pathway spawn-from-env command, allowing you to easily execute it by passing the PATHWAY_SPAWN_ARGS and other required environment variables into the container. This setup gets your code running in the cloud. The next section will guide you through configuring your application processes using Managed Kubernetes, a solution that allows you to run your code with minimal configuration overhead.
Running the Example in Managed Kubernetes
The Managed Kubernetes Service is the easiest way for you to run your program from a GitHub repository without excessive configuration.
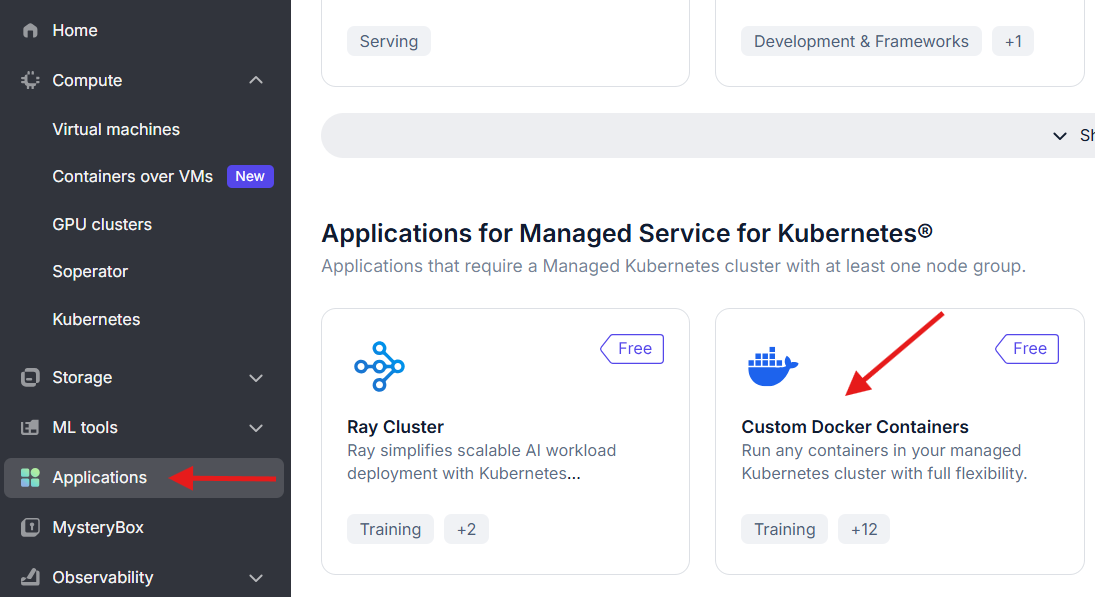
To get started, log in to Nebius and navigate to the Applications tab, where you will see several application options. Choose the Custom Docker Containers option, which is free, and click Deploy.
Then, proceed with the following steps:
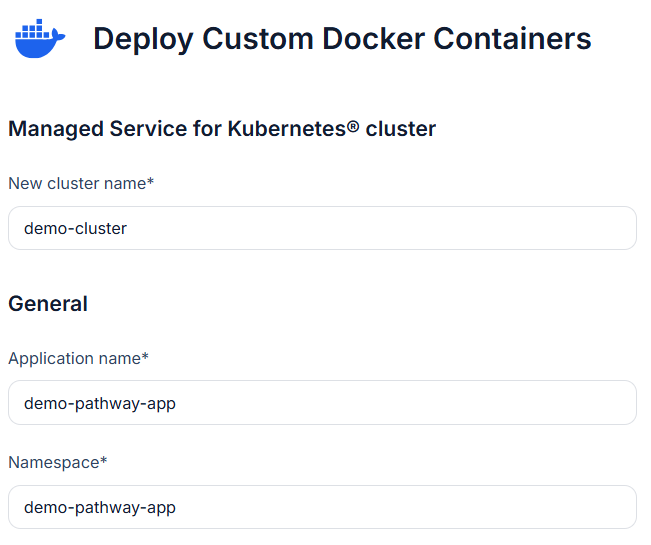
- Cluster and Application Setup
The instruction will prompt you to specify a cluster name. For demonstration purposes, you can use
demo-cluster. Set the Application Name and Namespace to values appropriate for your project. For example:demo-pathway-app.
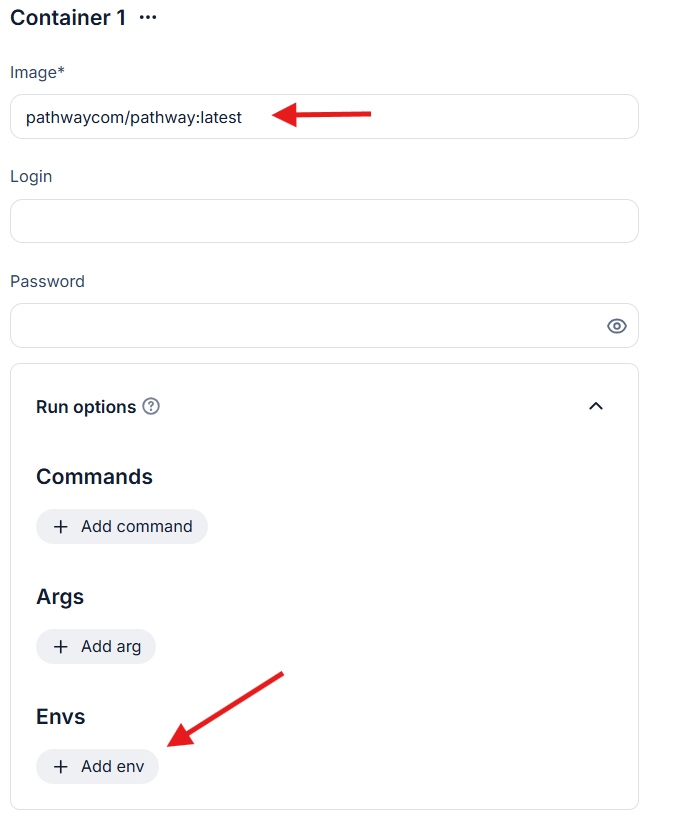
- Docker Image
In the Image field (required), enter
pathwaycom/pathwaywith an appropriate tag. You can pin a specific version tag to ensure your code remains compatible, for examplepathwaycom/pathway:0.27.0, or simply uselatestand specifypathwaycom/pathway:latest. Leave the Username and Password fields empty as no authentication is necessary. - Run Options In the Envs field, add all necessary environment variables, which we will cover in the following sections.
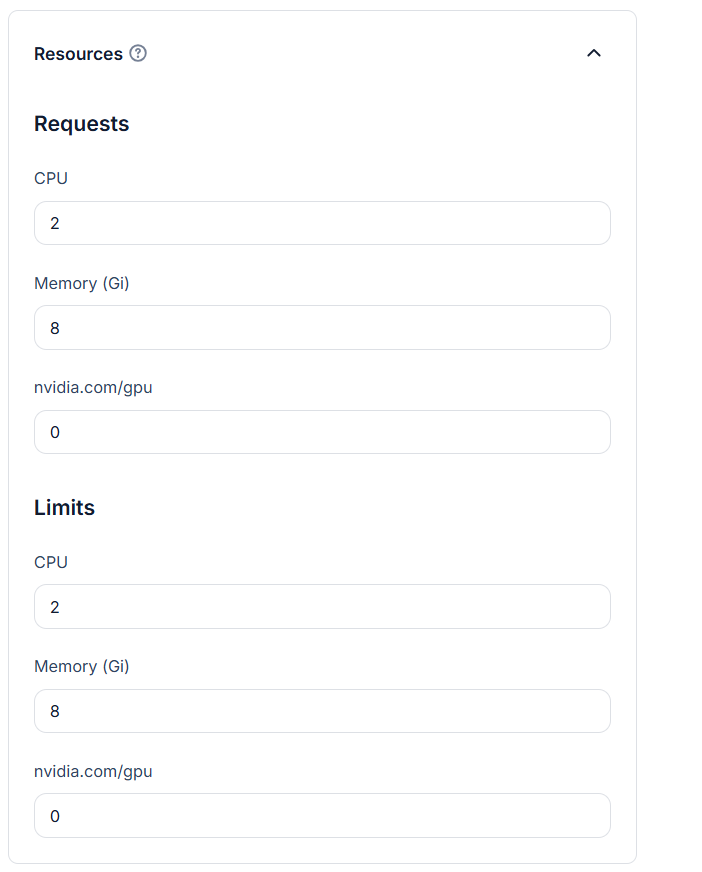
- Resources Configure CPU, memory, and GPU requests and limits. To avoid over-provisioning, you can set, for example, 2 CPU and 8 GB memory. GPU is not required for this demonstration. Be mindful that GPU resources are expensive.
- Ports Leave the Ports section empty, as you do not need to expose the container externally.
- Other Settings Additionally, you can configure the Auto Shutdown section to automatically remove workloads after completion, and the Others section to set the number of replicas if you want to run multiple instances of your pipeline.
In step 3, Run Options, we mentioned that you need to provide certain settings via environment variables. Let's take a closer look at this.
Here are the environment variables you will need to set:
PATHWAY_LICENSE_KEY: Pathway License key is required for Delta Lake features to work. You can get a free license here.AWS_S3_OUTPUT_PATH: The full path in S3 where the output will be stored.AWS_S3_ACCESS_KEY: Your S3 access key.AWS_S3_SECRET_ACCESS_KEY: Your S3 secret access key.AWS_BUCKET_NAME: The name of your S3 bucket.AWS_REGION: The region where your S3 bucket is located.GITHUB_PERSONAL_ACCESS_TOKEN: Your GitHub Personal Access Token, which you can obtain from the "Personal access tokens" page.PATHWAY_SPAWN_ARGS: Arguments for the Pathway Live Data Framework CLI. For this example, it specifies that the scriptmain.pyfrom thepathway-labs/airbyte-to-deltalakerepository should be run.
Once you have set the required environment variables and completed the basic configuration, you can proceed to the next step by clicking the Deploy Application button.
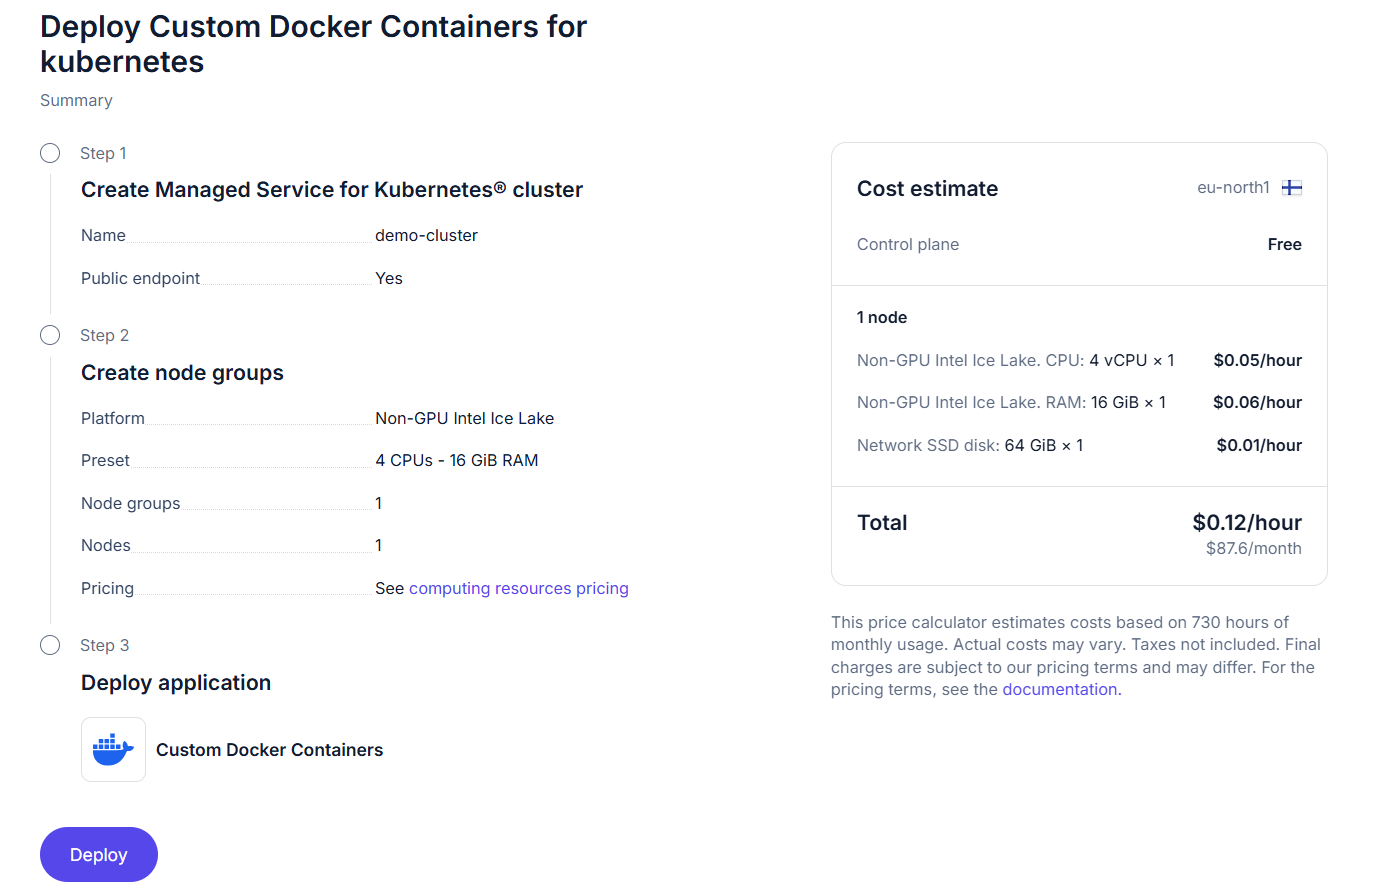
After clicking Deploy Application, you will see a recap of the configuration you selected. Please pay attention to the number of CPUs and GPUs, as GPUs are expensive. In the panel on the right, you will see an estimated hourly cost for running your container. Keep in mind that the container will continue running until you explicitly delete it. Be cautious to avoid overspending, especially during test deployments.
Starting the container will take some time, as the Kubernetes cluster is initialized, prepared, and finally the Docker container is launched. The initial setup may take around 10–20 minutes. You can monitor the deployment status in the control panel, which becomes available once you confirm your deployment by clicking Deploy.
Once the Execution Started
Please note the following behavior: when you launch a Docker container in this configuration, Kubernetes will automatically attempt to restart it whenever it stops, whether it completes successfully or fails.
If you expect your code to run only once and then stop, this will not happen automatically, as Kubernetes will keep trying to restart the container. To handle this properly, ensure that any output produced by your code is idempotent, meaning it can be safely overwritten multiple times. Alternatively, you can use Pathway Live Data Framework persistence to avoid recomputing data on each restart when running in static mode.
A better approach is definitely to use streaming mode, which allows your container to run continuously without worrying about restarts. However, even in streaming mode, it's a good practice to use persistence to maintain state across possible restarts.
Alternative Solution
Note that method described above is the simplest way to deploy a Pathway Live Data Framework application from your repository, but it is not the only one. For example, Nebius also provides the Containers over VMs option, which allows you to run any custom container that you have built and uploaded beforehand.
However, at the time of writing this tutorial, this approach does not support providing secrets or environment variables directly through the interface. This is why this tutorial describes the Kubernetes-based method. Still, if you are willing to build a container that either already contains the required secrets or fetches them and sets the environment variables on startup, this is also a valid option. It may even be preferable if you want a more lightweight deployment in terms of resource usage.
Keep in mind, though, that in this case you are responsible for the Docker image itself and for ensuring that it starts and runs correctly.
Accessing the Execution Results
After the execution is complete, you can verify that the results are in the S3-based Delta Lake using the delta-rs Python package.
It is worth noting that the code from the sample repository is designed for static mode. This means it runs once, saves the commits, and on the next run it will read and save the commits again. Because of this behavior, we need to slightly adjust our results-verification routine to ensure that we count unique commits only.
In general, if you are working not with a tutorial but with your own production code, please follow the recommendations from the previous section to handle restarts correctly.
from deltalake import DeltaTable


# Create an S3 connection settings dictionary
storage_options = {
    "AWS_ACCESS_KEY_ID": s3_access_key,
    "AWS_SECRET_ACCESS_KEY": s3_secret_access_key,
    "AWS_REGION": s3_region,
    "AWS_BUCKET_NAME": s3_bucket_name,

    # Disabling DynamoDB sync since there are no parallel writes into this Delta Lake
    "AWS_S3_ALLOW_UNSAFE_RENAME": "True",
}

# Read a table from S3
delta_table = DeltaTable(
    s3_output_path,
    storage_options=storage_options,
)
pd_table_from_delta = delta_table.to_pandas()

# Print the number of commits processed
unique_df = pd_table_from_delta.drop_duplicates(subset=["data"])
unique_df.shape[0]
1654
You can also verify the count: there were indeed 1654 commits in the pathwaycom/pathway repository as of the time this text was written.
Conclusions
Cloud deployment is a key part of developing advanced projects. It lets you deploy solutions that run reliably and predictably, while also allowing for flexible resource management, increased stability, and the ability to choose application availability zones.
However, it can be complex, especially for beginners who might face a system with containers, cloud services, virtual machines, and many other components.
This tutorial taught you how to simplify application deployment on Nebius cloud using Pathway Live Data Framework CLI and Pathway Docker Hub containers. You simply need to get a container with Pathway Live Data Framework CLI, set the repository and launch parameters, and use Nebius application.
Feel free to try it out and clone the example repository to develop your own data extraction solutions. We also welcome your feedback in our Discord community!