Delta Lake ETL with Pathway for Spark Analytics
 Sergey Kulik
Delta Lake ETL with Pathway for Spark Analytics
In the era of big data, efficient data preparation is essential for deriving actionable insights.
Apache Spark is a widely used data analytics tool for many enterprises. It can be made more powerful with Delta Lake, which provides efficient data storage, scalable metadata handling, and time travel support. This makes it easy for users to access and query previous versions of data.
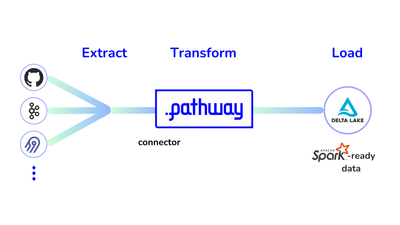
The Pathway framework provides an efficient way to do ETL with Delta Lake: you can extract and transform data from hundreds of sources and then store it in the Delta Lake format over a local filesystem or S3. Using Pathway, you can prepare your data efficiently and maximize the potential of your Spark-based analytics.
In this tutorial, you will learn how to install Pathway, configure a data processing pipeline with it, and prepare your data for efficient Spark analytics.
Sample Task
In this tutorial, you will create a pipeline that extracts data from GitHub commit history and prepares it for further analysis by extracting contributor while removing their address for privacy concerns.
By the end of this tutorial, you'll have a functional pipeline that processes GitHub commit data and stores it in a format optimized for Spark analytics.
The pipeline uses the ETL technique and consists of three steps:
- Extraction: Use an Airbyte connector, which leverages Airbyte Serverless, to set up data ingestion and ingest data from a GitHub repository.
- Transformation: Create user-defined functions (UDF) in Python to remove personal data, such as email addresses, from the commit data and prepare the columns for the produced data.
- Loading: Use the Pathway Delta Lake connector to load the transformed data.
Extraction
The extraction requires configuring Pathway connector for Airbyte. To get the sample configuration for the Airbyte source, you can use the CLI command.
pathway airbyte create-source github --image airbyte/source-github:latest
There are only a few places in the config that need to be edited:
personal_access_token: The PAT (Personal Access Token) is the easiest way to connect to GitHub. It can be obtained from the Tokens page on GitHub.repositories: The repository that you want to build analytics for must be specified here. In this demo, the Pathway open-source repository is used.streams: The goal is to analyze the stream of commits, so commits must be specified in this field.
After the setup, the config will look as follows. Please note that it is also saved into the ./github-config.yaml file, which will be used further.
source:
  docker_image: "airbyte/source-github:latest"
  config:
    credentials:
      option_title: "PAT Credentials"
      personal_access_token: YOUR_PAT_TOKEN
    repositories:
      - pathwaycom/pathway
    api_url: "https://api.github.com/"
  streams: commits
With the config in place, the next step is to configure the input using the Airbyte connector.
The pw.io.airbyte.read method requires several specifications:
- Config File: Use the
./github-commits.yamlconfig created in the previous step. - Mode: For testing, specify the
staticmode in the reader so the program terminates after reading all commits present at launch.
The GitHub connector is Python-based, meaning you don't need Docker to use it. To use the PyPI library of this connector, set the enforce_method parameter to pypi.
After that, you obtain the following code:
import pathway as pw

commits_table = pw.io.airbyte.read(
    "./github-config.yaml",
    streams=["commits"],
    enforce_method="pypi",
    mode="static",
)
Transformation
Now that the data extraction is configured, it's time to set up the transformation.
A key transformation step is removing personal data, such as emails, from the stream. In this example, let's use a simple method to scan the extracted JSON data and clean any string fields containing the @ sign, a part of email addresses. This removes the personally identifiable information (PII), making the data safe and accessible for various data analysts within the organization.
The email removal method looks like this:
import json


def remove_emails_from_data(payload):
    if isinstance(payload, str):
        # The string case is obvious: it's getting split and then merged back after
        # the email-like substrings are removed
        return " ".join([item for item in payload.split(" ") if "@" not in item])

    if isinstance(payload, list):
        # If the payload is a list, one needs to remove emails from each of its
        # elements and then return the result of the processing
        result = []
        for item in payload:
            result.append(remove_emails_from_data(item))
        return result

    if isinstance(payload, dict):
        # If the payload is a dict, one needs to remove emails from its keys and
        # values and then return the clean dict
        result = {}
        for key, value in payload.items():
            # There are no e-mails in the keys of the returned dict
            # So, we only need to remove them from values
            value = remove_emails_from_data(value)
            result[key] = value
        return result

    # If the payload is neither str nor list or dict, it's a primitive type:
    # namely, a boolean, a float, or an int. It can also be just null.
    #
    # But in any case, there is no data to remove from such an element.
    return payload


def remove_emails(raw_commit_data: pw.Json) -> pw.Json:
    # First, parse pw.Json type into a Python dict
    data = json.loads(raw_commit_data.as_str())

    # Next, just apply the recursive method to delete e-mails
    return remove_emails_from_data(data)
Personal information can then be removed by applying this function to the stream of commits:
commits_table = commits_table.select(
    data=pw.apply(remove_emails, pw.this.data)
)
Another useful transformation is to prepare the data for easier Spark analytics. This involves creating several columns that Spark jobs will use in daily analytics processes.
For example, the committer's user login and the timestamp of the change are important fields. These are extracted from JSON using the methods extract_author_login and extract_commit_timestamp, which are then applied to the commits_table to add the new columns.
def extract_author_login(commit_data: pw.Json) -> str:
    if not commit_data["author"]:
        return ""
    return commit_data["author"]["login"]


def extract_commit_timestamp(commit_data: pw.Json) -> pw.DateTimeUtc:
    return pw.DateTimeUtc(commit_data["created_at"].as_str())


commits_table = commits_table.select(
    author_login=pw.apply(extract_author_login, pw.this.data),
    commit_timestamp=pw.apply(extract_commit_timestamp, pw.this.data),
    data=pw.this.data,
)
Loading
The data is now prepared and ready to be saved.
Pathway provides a connector to write data into Delta Lake, available with the Pathway Scale and Pathway Enterprise tiers. You can get a license key from the Pathway website. After obtaining the key, simply provide it to the pw.set_license_key method.
pw.set_license_key("YOUR_LICENSE_KEY")
Once you provide the license key, you can proceed with saving the data.
Lake in the Local File System
In the case of a local file system, the process is straightforward: the table schema is automatically determined from the table columns, so you only need to specify the path where the Delta Lake should be saved.
To save the data, use the pw.io.deltalake.write method.
pw.io.deltalake.write(commits_table, "./commit-storage")
Lake in the S3 Bucket
Saving data to an S3 bucket can be a bit more challenging because you need to provide credentials for the connection. There are two main scenarios:
- Authenticated AWS Machine: If you're running the pipeline on a machine already authenticated with AWS, you can use a simple S3 path.
- Cloud Deployment: If you're working in a cloud deployment or a similar environment, you'll need to provide the credentials for the bucket using an object of type
pw.io.s3.AwsS3Settings. This setup is more complex and should be set up in the following way:
import os


# Forming the credentials
# To protect credentials, it's advised to store
# access key and secret access key in the environment variables
credentials = pw.io.s3.AwsS3Settings(
    access_key=os.environ["AWS_S3_ACCESS_KEY"],
    secret_access_key=os.environ["AWS_S3_SECRET_ACCESS_KEY"],
    bucket_name="aws-integrationtest",
    region="eu-central-1",
)

# Using the credentials to write the Delta Table
delta_table_path = "s3://bucket-name/your/delta/table/path/"
pw.io.deltalake.write(
    commits_table,
    delta_table_path,
    s3_connection_settings=credentials,
)
Obtaining Results
Finally, you can run the pipeline using the pw.run command:
pw.run(monitoring_level=pw.MonitoringLevel.NONE)
You can use the find command in UNIX to view the structure of the generated lake.
find ./commit-storage
The output looks as follows:
./commit-storage
./commit-storage/part-00000-06ff5709-5390-47a4-a5b5-72b3b0fa1970-c000.snappy.parquet
./commit-storage/_delta_log
./commit-storage/_delta_log/00000000000000000000.json
./commit-storage/_delta_log/00000000000000000001.json
At the top level, you'll find a file named with part-. This file is a data chunk converted to the Parquet format, which is optimized for querying. Parquet files are crucial for pipeline efficiency due to their optimized read performance, functioning as small, read-only databases that allow for fast and efficient data retrieval.
You'll also see a _delta_log directory, which contains the transaction log for the lake. This log supports Delta Lake's ACID transactions, scalable metadata handling, and data versioning. In this tutorial, the log has two files, named with version numbers: version 0 and version 1.
- Version 0: Contains the table creation details, including the table schema.
- Version 1: Records that the Parquet block was appended to the table.
Similarly, you can view the Delta Table contents in the S3 bucket using tools like the AWS console tool.
aws s3 ls s3://bucket-name/your/delta/table/path/
The command results in:
                           PRE _delta_log/
2024-07-19 13:36:18     325161 part-00000-6cd0a8b6-2fb9-494e-acef-2856988bb20c-c000.snappy.parquet
As in the previous case, you'll find a Parquet file and a _delta_log directory containing the transaction log for the table. You can view the transaction log by appending _delta_log/ to the end of the path.
aws s3 ls s3://bucket-name/your/delta/table/path/_delta_log/
The result is:
2024-07-19 13:36:11       1843 00000000000000000000.json
2024-07-19 13:36:18       5841 00000000000000000001.json
As before, there are two version files: one for the table creation and another for the data addition.
Querying Produced Data with Spark
Now you can verify that the article's goal has been achieved. It's time to install Spark libraries and implement a basic Spark query routine on the Delta Lake.
First, you need to install two essential libraries: pyspark, which is the core library for the computational engine, and delta-spark, an extension that allows Spark to work with Delta Lake.
pip install pyspark
pip install delta-spark
Once the libraries are installed, you can configure the Spark session.
from delta import configure_spark_with_delta_pip

from pyspark.sql import SparkSession
from pyspark.sql.functions import countDistinct

builder = (
    SparkSession.builder.appName("DeltaLakeUserLoginsAnalysis")
    .config("spark.sql.extensions", "io.delta.sql.DeltaSparkSessionExtension")
    .config(
        "spark.sql.catalog.spark_catalog",
        "org.apache.spark.sql.delta.catalog.DeltaCatalog",
    )
)
spark = configure_spark_with_delta_pip(builder).getOrCreate()
With this Spark session set up, you can now perform data queries.
For instance, you can extract contributor logins from the prepared data.
# Read the table
df = spark.read.format("delta").load("./commit-storage")

# Get only unique committer logins
unique_logins_df = df.select("author_login").distinct()

# Display the logins without length limit
unique_logins_df.show(unique_logins_df.count())

# Gracefully stop the Spark session
spark.stop()
At the result, this query indeed produces the list of unique committers to the repository.
+------------------+
|      author_login|
+------------------+
|    "szymondudycz"|
|      "gitFoxCode"|
|   "pw-ppodhajski"|
|     "zxqfd555-pw"|
|"krzysiek-pathway"|
|         "embe-pw"|
|    "janchorowski"|
|         "cla-ire"|
|          "olruas"|
|          "izulin"|
| "dependabot[bot]"|
|       "Saksham65"|
|     "Pathway-Dev"|
|         "XGendre"|
|         "avriiil"|
|                  |
|         "dxtrous"|
|        "ananyaem"|
|        "voodoo11"|
|        "lewymati"|
| "KamilPiechowiak"|
|   "berkecanrizai"|
+------------------+
Conclusion
Spark is a highly popular and widespread data analytics solution. Delta Lake, a format well-suited for Spark, enhances its users' capabilities by providing data reliability and performance.
In this tutorial, you learned how to do ETL with Pathway and Delta Lake by integrating your diverse data sources into this robust ecosystem. Pathway is the perfect data extraction and transformation tool for efficient and secure everyday analytics. So, don't hesitate to give it a try!
If you need any help with pipelining, feel free to message us on Discord or submit a feature request on GitHub Issues.


